

How to Follow
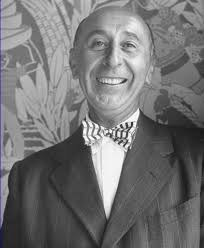
by Arthur Murray
Ten Exercises Which Teach You the Foundation Movements in Ballroom Dancing.
These exercises will develop grace, poise, and strength.
Early in life, I showed faint signs of having a sense of rhythm, which is quite natural in children, but my mother thought I was a child prodigy and exclaimed, “Ah! He is musical! We will buy him a piano, and he shall have music lessons.”
A few days later, the piano arrived, and with it, the man who was to make me a seventh wonder. The piano teacher was not new to the game, and after a few lessons, he gave up on me as a hopeless case.
“You read music unusually well and have a good sense of rhythm,” he said, “but you will never make a good pianist. A natural gift of rhythm and a reading knowledge of music do not qualify one as a pianist. If you wish to learn to play the piano, you must develop the muscles of your fingers through constant exercise. It takes hours and hours of practice before control over the fingers is gained. Do you suppose Paderewski learned to play the piano by spending his time on the baseball field?
“You are lacking in muscular coordination. Your knowledge of music is all in your head; your fingers, they are dumb. I see that you are not willing to practice the exercises which I have given you and, therefore, cannot hold out any hope for you as a pianist.”
And that little speech ended my career as a great musician.
Some time after that, I took up swimming. A kind friend showed me a number of the principal strokes, and I made a good job of committing to memory the various swimming movements before I went near the water. Never did I learn my studies so well as I memorized the various underhand, overhand, and other strokes in swimming. In my mind, I was a perfect swimmer, and I approached the water with the confidence of a professional. With absolute disgust, I looked upon the people who swam in shallow water; for my part, I chose that end of the pool where the water was at least ten feet deep.
After rehearsing in my mind the underhand stroke, I plunged into the deep water. Immediately, I went to the bottom! I tried every stroke I knew, but somehow they refused to work. In the meantime, I stayed at the bottom of the pool. When I realized that I had no means of reaching the surface, I cried for help, but that availed me nothing and filled my mouth full of dirty water. Thanks to one of the lifeguards, I am here to tell the tale.
I mention the incident of my failure to learn to swim and of my hopelessness as a pianist because they brought home very forcibly the fact that if we are to learn to do anything with our hands or feet, we cannot be content with simply having in our heads a knowledge of how it is to be done; we must get that knowledge down to our hands or feet by intensive training of the particular muscles we wish to develop.
By constant practice, we form a connecting line between our head and our hands or feet.
Having learned this lesson by sad experience, I am now putting it into practice in the teaching of social dancing.
Before teaching people to do the actual steps in a dance like the Fox Trot, I first give them a series of exercises. These exercises are the basis for infinite ballroom steps and may consist of movements which at first may seem entirely foreign to ballroom dance. The object of these exercises is to train the muscles used in dancing.
After the pupil has brought the required muscles under control, it is a simple matter to learn the details of the dance. In most instances, the pupil is capable of following her partner immediately after learning the exercises, which, by the way, bear a close relationship to physical culture exercises.
In my experience with teaching social dancing by giving a series of exercises, I have found that many of these exercises, in addition to teaching the person to dance, also serve as aids in developing the figure to the ideal form. That these exercises also make one graceful goes without saying.
Let us now consider some of these exercises in relation to those dancing steps for which they constitute the logical preparation, and for which they develop the coordination and technique necessary if one would do these dances well.
No. 1
In following (see photos 1-A and 1-B), it is essential for the girl to dance so that her feet will always be out of reach of her partner’s, and at the same time, she must dance with ease and without pulling away from him. The secret of knowing how to live through a dance and come out of the struggle with shoes untouched is to know how to walk.
For the lady, there are two ways of dancing backward: the ordinary way is to simply walk backward, but the good dancer does more than that. When she places her foot back, she does it in such a way that it looks pretty and will not be stepped upon.
Place the feet in what is called the First Position in dancing: the heels together and toes turned out. Move the right foot as far backward as it will go, and at the same time, stretch the toes well back so that only the front tip of the foot touches the floor. There should be a straight line from the hip to the big toe. Now, bring the foot back to the first position. Repeat the same exercise with the other foot.
This may be done to one-step music.

In this series of pictures are given specific exercises to develop the muscle-control and co-ordination needed for certain ballroom steps. In each case the exercise is identified with a companion photograph showing the particular step referred to. Photos 1-A and 1-B illustrate the correct method of walking backward, as described in the text, so that the foot will look pretty and will not be stepped upon. The photographs were posed by Miss Mary Faith Yow, one of the best dancers of the South, and Mr. Murray.”
No. 2
So often, people who are really good dancers make a bad appearance on the ballroom floor that I am tempted to give them an exercise which will remedy the cause of looking slovenly while dancing. It is largely a matter of the position of the head.
The exercise in photo 2-A looks easy, but it’s not. Try to do it. Ten attempts will make you feel as though you’ve done a hard day’s work, and you will perspire more freely than after running a mile in the hot July sun. But you will be a better dancer for it. This exercise will make you hold your head up high (see photo 2-B), and it will have the effect of strengthening your shoulder muscles as well as the muscles of your chest.
Begin each exercise by standing erect, with hands at sides and heels together. Then assume the position as shown in the illustration.
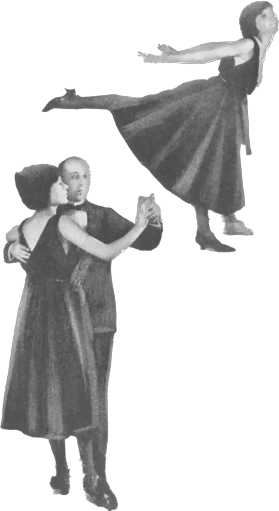
Photos 2-A and 2-B.“This exercise is intended to correct the position of the head so as to avoid a slovenly appearance while dancing. If you hold the head upward and backward while practicing this exercise, you will be assured of good position on the floor.
No. 3
“I could do the steps if I only knew what my partner would do next. How can I know?” I have been asked this question almost a million times, and always I think of the time I asked a doctor to cure my cold. He replied that if he knew how, he would surely cure his own. So it is with a man’s dancing; he himself often does not know what step he will do next, and, of course, the long-suffering partner must follow. The poor girl, who has no choice in the matter, can do but one thing: she must train her feet to always be ready for whatever steps the man takes a notion to do.
A knack of stepping backward quickly, and always having the feet slightly off the floor, are two of the best ways of being prepared for your partner. The exercise shown in Photo 3-A has been designed with these special points in view.
That it is also of help in various ballroom steps is incidental. The exercise needs no further description than a glance at the photograph. Just remember to kick backward very quickly. This exercise should be done first with one foot and then with the other. Fox Trot music is best if you would have that luxury. Begin with heels together. Kick the right foot up at the back, then bring the heels together.
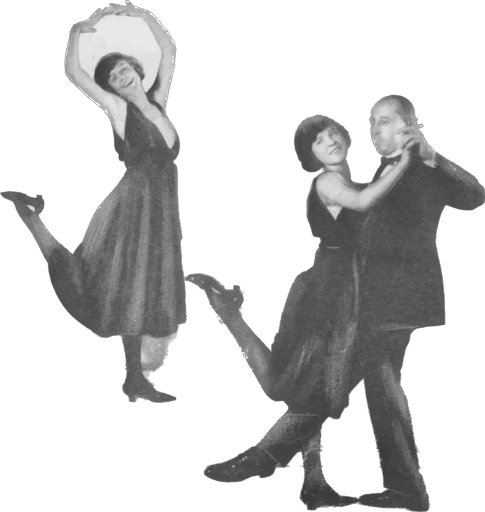
Photos 3-A and 3-B. The fair dancer should train her feet to be ready for whatever steps the partner takes a notion to do. This quick backward kick is the best training to prepare one to get her feet out of the way in a step like this.
No. 4
Here is an exercise upon which most of our steps are based. It also furnishes the groundwork for the Two-step and many popular variations, and is the best exercise to use in training the toes to turn outwardly.
Place your feet in a position similar to Miss Yow’s in Photo 4-A. Step backward with the right foot, then draw the left foot up to the right. Step back again with the right and draw the left up again. Repeat this movement around the room, bearing in mind that the toes must be well turned out.
This same exercise may be practiced with the left foot leading. How much better it looks when the girl uses only the tips of her toes! How much better looking is her foot than if she had put down the whole foot or even the ball of the foot! Photo 4-B shows how it works out in dancing.The fox trot music is most suitable and the steps are done very quickly.
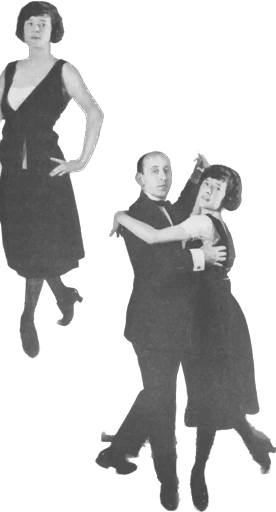
Photos 4-A and 4-B. This exercise furnishes the ground-work for the two-step and many popular variations, and for training the toes to turn out. A detailed description is given in the text.
No. 5
The test of a good dancer is the ability to do the side steps. One may often dance well when taking a forward or backward step, but the side movement frequently acts as a stumbling block. It is because of the difficulty of doing the side movements that so many people naturally fall into the habit of doing the two-step when supposedly they are waltzing. That the second step in each waltz measure is a side step proves the importance of this movement in social dancing. See Photo 5-B.
The best way of learning this most difficult of steps is by simply extending one foot to the side and raising it as high as possible, as in Photo 5-A. To gain a good sense of equilibrium, keep the body erect and raise the hand opposite. Practice this exercise using one foot ten times, then give the other foot a chance. Use either waltz or fox trot music.
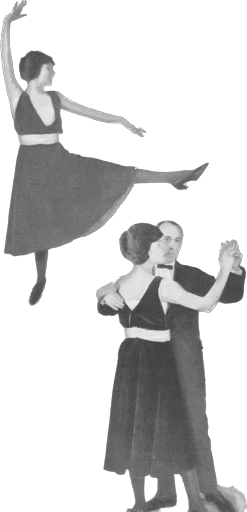
Photos 5-A and 5-B. An exer-cise for acquiring the side-step.Which is the second step in waltz measure. This is, to many people, a stumbling block.
No. 6
If you like steps which are more or less extreme, or if your partners are men who do not mind bending the wicked knee, this exercise will come in handy.
To start with, stand up straight and in a natural position. Take a long forward step with your right foot and throw the weight on that foot; at the same time, bend the right knee, as in Photo 6-A. Keeping the body erect, bend as far down as possible. Then, rise and resume your natural standing position. Without moving out of place, face about and step forward with the left foot, placing the weight on that foot. Notice that while one foot is bent, the other remains perfectly straight. Also, note that the toes are well turned out.
In practicing this exercise to music, allow three beats of the waltz for this downward movement, and three beats to rise into place again.
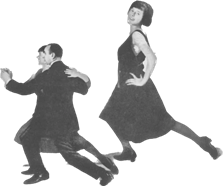
Photos 6-A and 6-B. This exercise will prepare you for those steps in which the bending of the knee is necessary. It will give you the strength and control which will enable you to do these steps gracefully.
No. 7
Perhaps the most common question in dancing is: “Shall I dance on my heels, the balls of my feet, or shall I dance on my toes?”
There is but one answer: Dance on the tips of your toes only! Dancing on the toes not only makes one lighter, but it also makes one look a hundred percent better. Another question frequently asked is: “How shall I place my feet? Should they be placed to the side of my partner’s or in between one another?” Both ways are wrong. The man’s feet should be placed directly in front of the lady’s, and when the girl walks backward, the man must follow in her footsteps. (See Photo No. 7.) When the man goes backward, the lady should not be afraid of stepping on her partner’s feet, but she should step directly toward him.
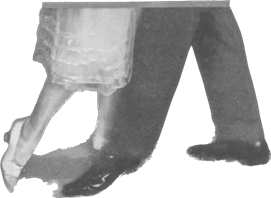
Photo 7. Should one dance on the heels, balls of the feet, or the toes? The answer is, the tips of the toes only. The toes of the two partners should be placed exactly opposite each other, not sandwiched between.
No. 8
Why is it that the champion walker finds a snag the moment she tries walking forward, or rather toward her partner? Any girl who has walked forward while the man danced backward knows that going toward her partner gives one a most uncomfortable feeling.
It is because walking on the street and walking with a partner bring into play different muscles. In dancing, the girl not only goes forward, but she is called upon to raise her foot in front, a mean trick on the man’s part to make it necessary, because it calls for uncommon ability and grace.
A little practice doing the exercise shown in Photo 8-A will go a long way in teaching one to follow in forward movements, as shown in Photo 8-B. Without bending the body forward, raise the foot in front until it is parallel with the floor. Keep in mind that the toes must turn downward and not upward. To develop your dancing poise, hold your foot up in front for five seconds, then lower it slowly. Do it without music.
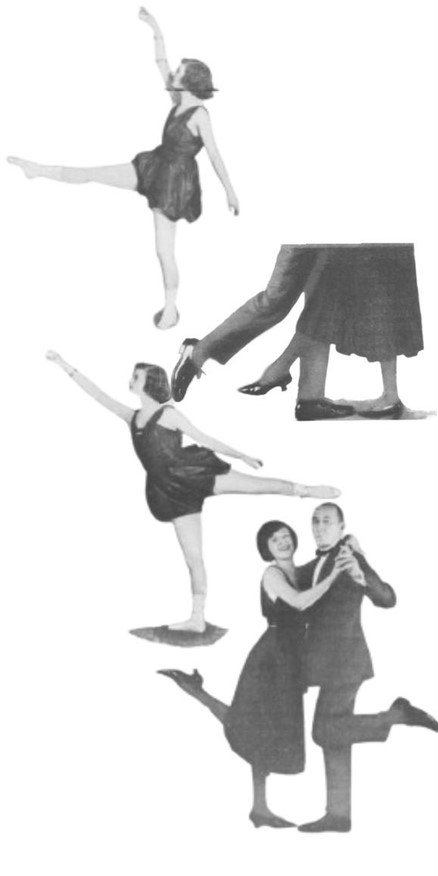
Photos 8-A and 8-B.One of the greatest difficulties a mirl experiences, is in walking toward her partner, being compelled to raise her foot in front.This exercise, described in the text, will give her the control and snap desired.
Photos 9-A and 9-B.This exercise important if one would be light dancer. “She should not expect her partner to carry her.The kick-up step shown, is used in the College Rock. The exercise is carefully described in the text.
No. 9
At the same time that we practice the exercises of the feet, it is well to give the arms and hands some work to do. Not only will the arms and hands become more graceful, but the exercise will strengthen them. This last is most essential if you would be a light dancer. Too often a girl seems “heavy” simply because the upper part of her arms is weak, and their weight rests upon the man’s arms. The man has his own hands to hold up; any additional weight may make dancing a bore rather than a delight.
The exercise shown in Photo 9-A, besides being useful in following, has a direct bearing on the Kick-up Step in the College Rock, as shown in Photo 9-B. Lift the right foot at the back, raising it as high as possible. At the same time, bring the left hand up in front and the right hand behind. Hold this pose for a full second, then slowly lower the hands and feet to the original position. Always let the wrists lead when moving the arms and hands.
Repeat this exercise by raising the left foot and right hand. Waltz music is best for practicing this exercise.
Exercise No. 10
Another good exercise, one used in teaching ballet dancing, is to raise the foot in front, and while it is up high, carry it sideways and then to the back, holding it up high at the back before lowering.
FOUR WALKING STEPS AND THE TWO-STEP
We will now combine the walking steps with the Two-step. The man will walk forward 4 steps, then take the Forward Two-step, while the lady walks backward 4 steps and does the Backward Two-step.
Man’s Part:
- Walk forward: 1 Left Foot (LF); 2 Right Foot (RF); 3 LF; 4 RF.
- Then do the Forward Two-step. (See description of the Forward Two-step if you are not already familiar with it.)
- Repeat, beginning with walking steps.
Lady’s Part:
- Walk backward: 1 RF; 2 LF; 3 RF; 4 LF.
- Then do the Backward Two-step beginning with the Right Foot. (See description of the Backward Two-step if not already familiar with it.)
To repeat the FOUR WALKING STEPS AND THE TWO-STEP, the man begins with the left foot, and the lady begins with the right foot. At least an hour should be spent practicing this step.
The Two-step is made up of three steps: slide, draw, slide. For convenience, we count it 1, 2, 3. Some teachers count a Two-step as 1-AND-2. Either way is correct. The word “and” is often confusing, therefore, we will continue to count a Two-step as 1, 2, 3.
Remember that there is a slight pause after you have taken the third step in the Two-step; also after the sixth step.
Caution: Do not go any further until you are positive that you are thoroughly familiar with all the information in the foregoing lessons. Begin at the first page and read carefully all information to be sure that you have not missed anything.